
Hello there! The winter holidays are coming up and we thought of helping you put your IoT knowledge to work through a fun Christmas project using Wyliodrin STUDIO: build smart Christmas lights!
Together we are going to make this fun Christmas IoT decoration using:
- one Raspberry Pi;
- one Arduino Uno;
- one serial cable to connect the two;
- one Adafruit NeoPixel LED strip;
- one 470 Ohm resistor;
- one breadboard;
- jumper wires.
Setup
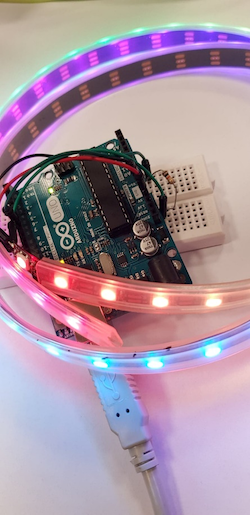
Just connect the LED strip to the Arduino using jumper wires (GND to GND, +5V to 5V and Din through the resistor to Digital pin 6). Then, connect the Arduino to the Raspberry Pi using the serial cable and plug in the Raspberry Pi.
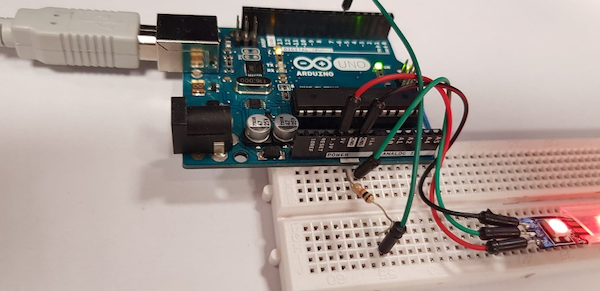
If it looks like this, you are good to go!
Project Structure
The way everything is going to work is:
- the Arduino is the one that will command the LED stripe. Depending on what command it receives on the serial port, the Arduino will light up the LED stripe in a different way;
- the Raspberry Pi will host a server to which anyone on the same Wi-Fi network can connect; it will serve the user a simple web interface where the lighting mode can be selected; after the user makes the selection, the Raspberry Pi will send the message to the Arduino through the serial port.
You can find the Wyliodrin STUDIO application on github. To use it, simply download the ChristmasLights.wylioapp file and import it into the Wyliodrin STUDIO application. You can also follow the steps below to write the application from scratch.
The Raspberry Pi Code
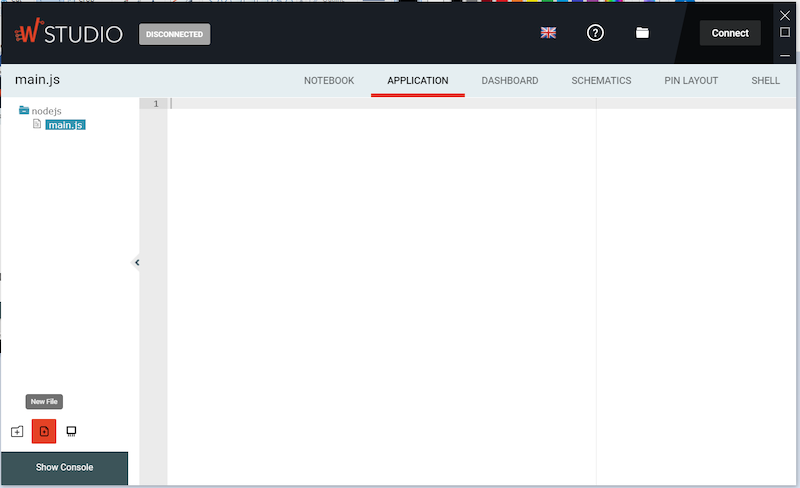
From Wyliodrin STUDIO, create a new JavaScript project. Pick a name for it and add two files: main.js and index.html, as shown below.
The Backend
Copy the following code and paste it into the main.js file of your project.
const express = require('express');
const SerialPort = require("serialport");

const app = express();
app.disable('etag');


const serialPort = new SerialPort("/dev/ttyACM0", {
  baudRate: 9600
});

serialPort.on('data', function(data)
{
  console.log(7);
  console.log(data.toString());
});

serialPort.on("open", function () {
  console.log('Arduino talking open');
});

app.get('/', function (req, res) {
  res.sendFile('index.html', {root: __dirname}, function (err) {
     if (err) {
       console.log('Server error!');
       res.sendStatus(500);
     }
  });
});

app.get('/light', function (req, res) {
  serialPort.write(req.query.num.toString() + 'delim');
  res.sendStatus(200);
});

const server = app.listen(3000, function () {
   console.log('Christmas Lights server started');
});
This basically sets up an Express server listening on port 3000 on your Raspberry Pi. The server knows how respond to GET requests on two routes:
- “/”, which serves the index.html page we are going to create later;
- “/light”, which will send to Arduino via serial which lighting mode should the LED stripe display. Here, we also initialize the serial connection between the Raspberry Pi and Arduino.
The server will control the interface through which you can interact with the Christmas lights.
The Frontend
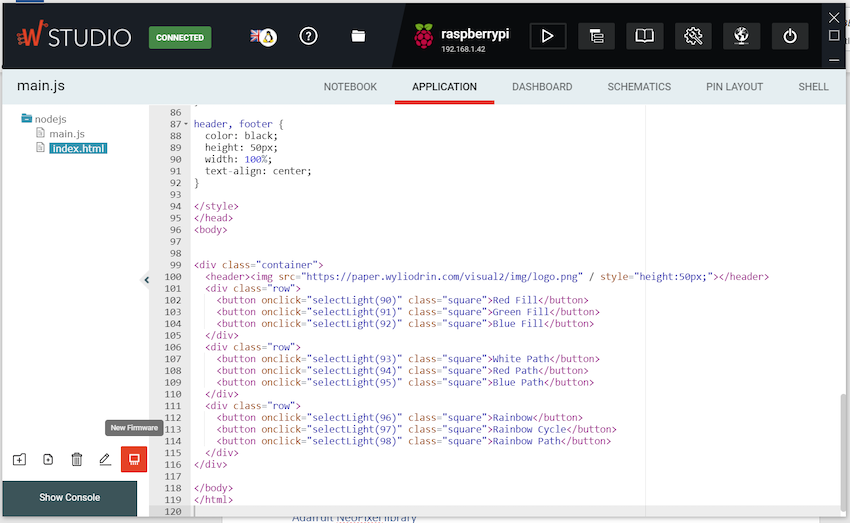
Copy the following code and paste it into your index.html file.
<!DOCTYPE html>
<html>
<head>
<script>
function selectLight(num) {
  console.log(num);
  var xhttp = new XMLHttpRequest();
  xhttp.onreadystatechange = function() {
    if (this.readyState == 4 && this.status == 200) {
      //all ok
    }
  };
  xhttp.open("GET", "light?num=" + num, true);
  xhttp.send();
}
</script>
<style>
body,
.container {
  position: absolute;
  top: 0;
  left: 0;
  margin: 0;
  width: 100%;
  height: 100vh;
}

.container {
  display: -webkit-box;
  display: -moz-box;
  display: -ms-flexbox;
  display: -o-flexbox;
  display: -webkit-flex;
  display: flex;
  background-color: #afafaf;
  -webkit-flex-direction: column;
  -moz-flex-direction: column;
  -ms-flex-direction: column;
  -o-flex-direction: column;
  flex-direction: column;
}

.row {
  background-color: #e5e5e5;
  -webkit-flex: 5;
  -moz-flex: 5;
  -ms-flex: 5;
  -o-flex: 5;
  flex: 5;
  display: -webkit-box;
  display: -moz-box;
  display: -ms-flexbox;
  display: -webkit-flex;
  display: flex;
  -webkit-flex-direction: row;
  -moz-flex-direction: row;
  -ms-flex-direction: row;
  -o-flex-direction: row;
  flex-direction: row;
}

.square {
  background-color: #cacaca;
  -webkit-flex: 4;
  -moz-flex: 4;
  -ms-flex: 4;
  -o-flex: 4;
  flex: 4;
  display: -webkit-box;
  display: -moz-box;
  display: -ms-flexbox;
  display: -webkit-flex;
  display: flex;
  text-align: center;
  -webkit-justify-content: center;
  -moz-justify-content: center;
  -ms-justify-content: center;
  -o-justify-content: center;
  justify-content: center;
  -webkit-flex-flow: column wrap;
  -moz-flex-flow: column wrap;
  -ms-flex-flow: column wrap;
  -o-flex-flow: column wrap;
  flex-flow: column wrap;
}

header, footer {
  color: black;
  height: 50px;
  width: 100%;
  text-align: center;
}

</style>
</head>
<body>


<div class="container">
  <header><img src="https://paper.wyliodrin.com/visual2/img/logo.png" / style="height:50px;"></header>
  <div class="row">
    <button onclick="selectLight(90)" class="square">Red Fill</button>
    <button onclick="selectLight(91)" class="square">Green Fill</button>
    <button onclick="selectLight(92)" class="square">Blue Fill</button>
  </div>
  <div class="row">
    <button onclick="selectLight(93)" class="square">White Path</button>
    <button onclick="selectLight(94)" class="square">Red Path</button>
    <button onclick="selectLight(95)" class="square">Blue Path</button>
  </div>
  <div class="row">
    <button onclick="selectLight(96)" class="square">Rainbow</button>
    <button onclick="selectLight(97)" class="square">Rainbow Cycle</button>
    <button onclick="selectLight(98)" class="square">Rainbow Path</button>
  </div>
</div>

</body>
</html>
This contains the code for the page served by the Raspberry Pi. It will make a GET request on the “/light” route every time the user selects a different mode, also sending the code (from 90 to 98) corresponding to the selected mode. Here we also included some css (between the <style> tags) just to make everything look nicer. You can also flex your design skills and adapt the interface to make it more colorful.
The Arduino Code
Wyliodrin STUDIO also lets you write code for devices connected to your Raspberry Pi, not only for the actual Raspberry. Let’s try that and add some code for our Arduino.
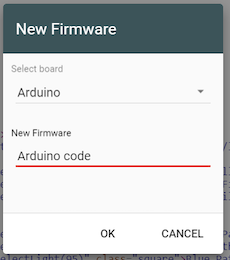
Click on the New Firmware button and pick Arduino as your board.
The Adafruit NeoPixel Library
Since we are using the Adafruit NeoPixel LED strip as the Christmas lights, we are also going to use the library they provide. You can find the library here. You need to open in the browser or clone the application, copy the contents of “Adafruit_NeoPixel.cpp” and “Adafruit_NeoPixel.h” and add them to your Arduino firmware in the Wyliodrin Studio project. Simply create two empty files called “Adafruit_NeoPixel.cpp” and “Adafruit_NeoPixel.h” and paste the code.
LED Stripe Control
Now, we are going to write the code that, using the Adafruit library, will control the LED stripe. Add an arduino.ino file to your Firmware folder in Wyliodrin STUDIO and paste the code below.
#include "Adafruit_NeoPixel.h"
#ifdef __AVR__
  #include <avr/power.h>
#endif

#define PIN 6

// Parameter 1 = number of pixels in strip
// Parameter 2 = Arduino pin number (most are valid)
// Parameter 3 = pixel type flags, add together as needed:
//   NEO_KHZ800  800 KHz bitstream (most NeoPixel products w/WS2812 LEDs)
//   NEO_KHZ400  400 KHz (classic 'v1' (not v2) FLORA pixels, WS2811 drivers)
//   NEO_GRB     Pixels are wired for GRB bitstream (most NeoPixel products)
//   NEO_RGB     Pixels are wired for RGB bitstream (v1 FLORA pixels, not v2)
//   NEO_RGBW    Pixels are wired for RGBW bitstream (NeoPixel RGBW products)
Adafruit_NeoPixel strip = Adafruit_NeoPixel(60, PIN, NEO_GRB + NEO_KHZ800);

// IMPORTANT: To reduce NeoPixel burnout risk, add 1000 uF capacitor across
// pixel power leads, add 300 - 500 Ohm resistor on first pixel's data input
// and minimize distance between Arduino and first pixel.  Avoid connecting
// on a live circuit...if you must, connect GND first.

void setup() {
  // This is for Trinket 5V 16MHz, you can remove these three lines if you are not using a Trinket
  #if defined (__AVR_ATtiny85__)
    if (F_CPU == 16000000) clock_prescale_set(clock_div_1);
  #endif
  // End of trinket special code

  Serial.begin(9600);

  strip.begin();
  strip.setBrightness(50);
  strip.show(); // Initialize all pixels to 'off'
}

void loop() {
  if (Serial.available() > 0){
    int c = Serial.parseInt();
    Serial.println(c, DEC);

    if (c == 90)
      colorWipe(strip.Color(255, 0, 0), 50); // Red
    else if (c == 91)
      colorWipe(strip.Color(0, 255, 0), 50); // Green
    else if (c == 92)
      colorWipe(strip.Color(0, 0, 255), 50); // Blue
    else if (c == 93)
      theaterChase(strip.Color(127, 127, 127), 50); // White
    else if (c == 94)
      theaterChase(strip.Color(127, 0, 0), 50); // Red
    else if (c == 95)
      theaterChase(strip.Color(0, 0, 127), 50); // Blue
    else if (c == 96)
      rainbow(20);
    else if (c == 97)
      rainbowCycle(20);
    else if (c == 98)
      theaterChaseRainbow(50);
  }
}

// Fill the dots one after the other with a color
void colorWipe(uint32_t c, uint8_t wait) {
  for(uint16_t i=0; i<strip.numPixels(); i++) {
    strip.setPixelColor(i, c);
    strip.show();
    delay(wait);
  }
}

void rainbow(uint8_t wait) {
  uint16_t i, j;

  for(j=0; j<256; j++) {
    for(i=0; i<strip.numPixels(); i++) {
      strip.setPixelColor(i, Wheel((i+j) & 255));
    }
    strip.show();
    delay(wait);
  }
}

// Slightly different, this makes the rainbow equally distributed throughout
void rainbowCycle(uint8_t wait) {
  uint16_t i, j;

  for(j=0; j<256*5; j++) { // 5 cycles of all colors on wheel
    for(i=0; i< strip.numPixels(); i++) {
      strip.setPixelColor(i, Wheel(((i * 256 / strip.numPixels()) + j) & 255));
    }
    strip.show();
    delay(wait);
  }
}

//Theatre-style crawling lights.
void theaterChase(uint32_t c, uint8_t wait) {
  for (int j=0; j<10; j++) {  //do 10 cycles of chasing
    for (int q=0; q < 3; q++) {
      for (uint16_t i=0; i < strip.numPixels(); i=i+3) {
        strip.setPixelColor(i+q, c);    //turn every third pixel on
      }
      strip.show();

      delay(wait);

      for (uint16_t i=0; i < strip.numPixels(); i=i+3) {
        strip.setPixelColor(i+q, 0);        //turn every third pixel off
      }
    }
  }
}

//Theatre-style crawling lights with rainbow effect
void theaterChaseRainbow(uint8_t wait) {
  for (int j=0; j < 256; j++) {     // cycle all 256 colors in the wheel
    for (int q=0; q < 3; q++) {
      for (uint16_t i=0; i < strip.numPixels(); i=i+3) {
        strip.setPixelColor(i+q, Wheel( (i+j) % 255));    //turn every third pixel on
      }
      strip.show();

      delay(wait);

      for (uint16_t i=0; i < strip.numPixels(); i=i+3) {
        strip.setPixelColor(i+q, 0);        //turn every third pixel off
      }
    }
  }
}

// Input a value 0 to 255 to get a color value.
// The colours are a transition r - g - b - back to r.
uint32_t Wheel(byte WheelPos) {
  WheelPos = 255 - WheelPos;
  if(WheelPos < 85) {
    return strip.Color(255 - WheelPos * 3, 0, WheelPos * 3);
  }
  if(WheelPos < 170) {
    WheelPos -= 85;
    return strip.Color(0, WheelPos * 3, 255 - WheelPos * 3);
  }
  WheelPos -= 170;
  return strip.Color(WheelPos * 3, 255 - WheelPos * 3, 0);
}
We based our code on Adafruit’s example you can find on github. This code defines all the different modes the LED stripe will light up. The Arduino will take the code it receives on its serial port from the Raspberry Pi (the one ranging from 90 to 98) and will change the colors displayed by the LED stripe accordingly.
Run the Application
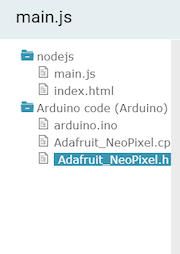
In the end, your project structure should look something like this:
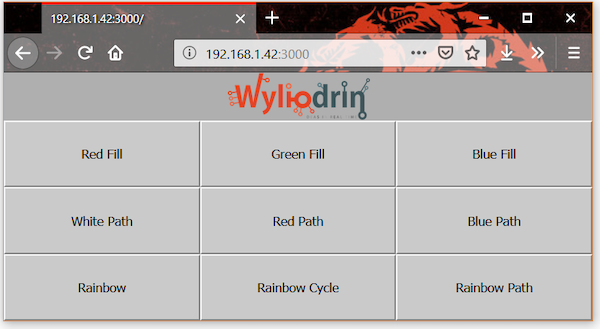
Make sure everything is plugged in, connect to your Raspberry Pi and run the main.js file. While the main.js is running, open a tab in your favorite browser and write “

It should look something like this:
Congratulations on building your own smart Christmas lights system! Feel free to play around and give the project your own personal touch by adding different lighting modes, improving the index.html file or adding new functionalities to it! Send us photos of our projects and we will post the best ones here.
We wish you all warm holidays, a Merry Christmas and happy IoT-ing!